They say that fashion trends come and go in cycles before returning again at some point in the future. You could argue that the same is also true for websites and the technology used to build them.
In the 1990’s, websites were created using offline applications that generated all the site’s HTML pages which were then uploaded to a webserver to be served to users’ browsers. Later this model evolved to one in which the website pages were generated “on the fly” using server side technologies like Microsoft’s ASP Pages, PHP or Java’s Servlet/JSP frameworks.
With the advent of Web 2.0 things changed as some or all of the former backend logic and code processing was brought to the client utilizing the Javascript engine within the web browser. Supporting this model gave rise to the explosion of REST based APIs and services that we see today. A good example of this change was the launch of Google Maps on the web; a highly personalised web experience where content generation was shared between the browser’s Javascript engine and Google’s backend REST APIs.
In the last few years, we have seen a resurgence of purely static websites where pages are generated offline, uploaded to a server and delivered as HTML/CSS/JS to a requesting web browser. Blogs are a perfect candidate for this type of model since the content is not personalised per visitor, and complex page and site structures can be generated “out of band” and served very efficiently by low power servers while also being able to make use of caching at the edge using CDNs (Content Delivery Networks).
Blogging Sidebar
With the rise in blogging over the past 15 years, many different solutions were developed. The most popular being SAAS (software as a service) solutions like WordPress and Blogger. More recently newer competitors like Wix and SquareSpace have also appeared in this space.
All follow a backend server processing model requiring powerful servers and a supporting database to hold the blog content, and a web UI to support content management and editing. WordPress was and still is available as a self-hosted option but that means provisioning a server, installing WordPress and keeping your WordPress distribution and database up to date. Quite a lot of work if your sole objective is to share content with the world.
Many bloggers with smaller sites have started ditching these SAAS solutions in favour of lighter weight and arguably more flexible solutions. In many cases switching from a service which incurred a monthly fee to one that could be completely free. These alternate solutions come in the form of open source projects like Jekyll and Hugo; both of which follow a static website generating model developed more than 20 years ago.
Both Jekyll and Hugo create static websites from a set of assets organised in a single project folder; similar to what website creators did in the 1990’s. The real differences between now and then is that today’s websites are a lot more sophisticated, as are the visitors who all expect great UX, images and clear navigation along with other features like content search. Where Jekyll started Hugo now seems to be taking over as it rapidly gains in popularity and use.
This post explains how to create a blog using Hugo but rather than duplicating the Hugo documentation, we’ll focus more on how to structure your local project to work well with Github and git source control. Github is the 700lb gorilla which can then take care of the heavy lifting of source control, backups and serving your website to the world - and it can even do this at no cost to you other than your time.
Installing Hugo
To get started with Hugo you first need install it on your local machine. Depending on your platform, this is normally a quick and simple process.
On a Mac with Brew installed, it’s just a matter of executing
brew install hugo
It’s still a good idea to have a read through of the Getting Started section of the Hugo documentation beforehand though.
Creating Your First Hugo Website
Create a new directory to hold your Hugo website(s) and navigate into it.
mkdir hugo-websites
cd hugo-websites
Let’s call our blogging site mynewblog and let’s create it using the following command
hugo new site mynewblog
This will create a folder containing all the assets for your blog like this
.
└── mynewblog
    ├── archetypes
    │   └── default.md
    ├── config.toml
    ├── content
    ├── data
    ├── layouts
    ├── static
    └── themes
- The
config.tomlfile holds your site configuration information- I prefer to convert this to a
config.yamlfile because the YAML syntax is nicer
- I prefer to convert this to a
- The
contentfolder is where you will add your folders, pages, posts, about page etc - The
staticfolder is where you can place your assets; normally the images you wish to use on your pages - The
themesfolder is where your chosen theme will reside
Choosing a Hugo Theme
Once you have Hugo installed and your new site created, your next decision is which theme to use. There are literally hundreds to choose from and most are listed at https://themes.gohugo.io/
Be warned that you will probably spend a lot more time browsing the available themes than you will getting Hugo up and running! Don’t get too stressed about which one to choose because you can quickly and easily replace it by another whenever you want.
After choosing a theme, make sure you update the project config file config.yaml to include your theme as a key/value pair.
baseURL: 'http://www.mydomain.com'
languageCode: 'en-us'
title: 'My New Blog'
theme: 'PaperMod'
...
Before I explain the correct way to install themes (in my opinion), we need to look at how to get your new local Hugo project and Github working together.
Organising your Github Repos
If you don’t already have a github account, then go ahead and create one at Github.com. You may also want to create a new account if you want to keep your blogging project(s) separate from your other projects on Github.
Opening a Github account is free and you can have as many as you want provided you register a different email address each time. You may find this post helpful if you want to work with different Github accounts from the same machine.
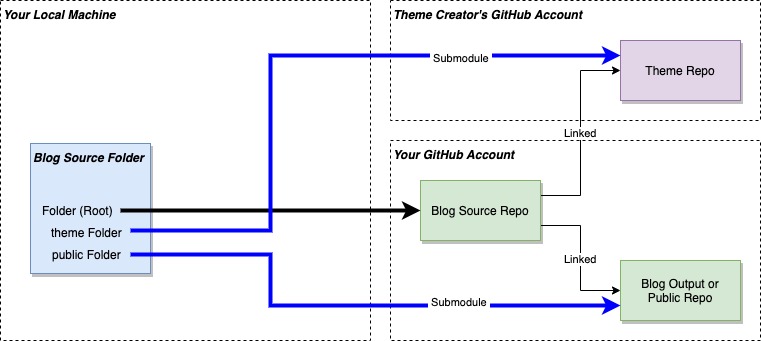
In your personal Github account you should now create two repositories
- A (private) one to host the entire Hugo website you just created
- Let’s call this
blog-source
- Let’s call this
- A (public) one to host just the
publicfolder of the website project- Let’s call this
blog-public - Making this a Pages repository type will enable to Github to host and serve our website without the need for any external webserver
- This will “linked” as a submodule of your
blog-sourcerepo
- Let’s call this
Once you’ve created the two repos, it’s time to link them to the local project using the git remote and git submodule commands. Make sure you’re in the mynewblog folder on your local machine before executing any of the following commands
git init
git remote add origin https://github.com/YOUR-ACCOUNT-NAME/blog-source.git
You’ve now linked your entire project folder mynewbloog to the remote blog-source repo (hosted on Github) under your Github account.
Now we can link the public folder of the project to your other Github repo with the following command
git submodule add https://github.com/YOUR-ACCOUNT-NAME/blog-public.git public
The final step is to link your chosen theme to the project - I’ve chosen the PaperMod theme for this example
git submodule add https://github.com/adityatelange/hugo-PaperMod.git themes/PaperMod --depth=1
To make sure that submodules get cloned correctly when you re-clone your repo execute the following command
git submodule update --init --recursive
After doing all of the above, you should have your blog project organised with the following local and remote repo structures on Github
Create your first Blog Post
You can now have Hugo create your first post my-first-post by doing this
hugo new posts/my-first-post.md
If you open the new file my-first-post.md in your favourite text editor, you will see the following text in it
---
title: "My First Post"
date: 2022-01-01T07:00:00Z
draft: true
---
This section at the top of the page is called the front matter which is YAML meta data about the page. You can add more entries to this configuration to customise the page in specific ways; some of which I’ll describe later.
Below the meta data is where you should add your content. This is done using Markdown notation which is a shorthand form of HTML and supports all things that you will want to use like text styles, lists, tables, horizontal rules, code blocks, quotations, links and images etc. If you’re not familiar with the Markdown syntax then search for a tutorial online - it is pretty easy to understand.
Any images that you want to reference in your page should be copied into the static folder of the project and referenced like this (using Markdown syntax).
...
Some text above my beautiful photo

And text below it
...
Viewing your changes locally
Editing using Markdown is one thing, but actually seeing the page in a browser requires you to start Hugo in Server mode on your local machine. Again make sure you are in the mynewblog folder and execute the following
hugo server -D
The -D switch ensures that Hugo displays all posts including draft ones; which your first post will be by default. Just hit Ctrl-C any time you want to exit Hugo’s server mode.
Now enter the following address http://localhost:1313/ in your web browser to view your blog web site being served by Hugo locally.
Any time you make changes to your copy, images etc, Hugo will refresh the webpage automagically. If it doesn’t make sure that the Hugo server is still running, and otherwise try reloading the page in your browser.
Publish your changes to Github
Before publishing your local changes to Github make sure you stop Hugo running in server mode and then have Hugo build the contents of the public folder using the following command
hugo
The final step is to get your blog website pushed to your Github repos using standard git commands to add, commit and push your files as shown here
1: Stage the files
# Check to see the status in git of each file
$ git status
On branch master

No commits yet

Untracked files:
  (use "git add <file>..." to include in what will be committed)
	.hugo_build.lock
	archetypes/
	config.yaml
	content/

# Now add the files that you want managed by git
$ git add archetypes/
$ git add config.yaml
$ git add content/
2: Commit the files
# Check the status again following the git add
$ git status
No commits yet

Changes to be committed:
  (use "git rm --cached <file>..." to unstage)
	new file:   archetypes/default.md
	new file:   config.yaml
	new file:   content/posts/my-first-post.md

Untracked files:
  (use "git add <file>..." to include in what will be committed)
	.hugo_build.lock

# Now commit your files
$git commit -m 'added first post'
[master (root-commit) 241db28] added first post
 3 files changed, 15 insertions(+)
 create mode 100644 archetypes/default.md
 create mode 100644 config.yaml
 create mode 100644 content/posts/my-first-post.md
Commit the public folder too otherwise your site won’t be updated! This is because modifications to the submodule need to be added and committed as a separate step
$cd public

$git add .

$git commit -m 'added first post'
On branch master
Your branch is ahead of 'origin/master' by 1 commit.
  (use "git push" to publish your local commits)

$cd ..
3: Push the changes to both your repos
# Push your commit to the blog-source and blog-public repos
git push -u origin master --recurse-submodules=on-demand
After this command executes, look at the code sections of your repos in Github and you should see that your local project has been pushed to both remotes repos using a single push command.
Note that you may want to include a .gitignore file in your project to exclude the Hugo build lock allowing you to add all changed files in one go using git add . instead of specifying the individual files (as I did above).
$ cat .gitignore
.hugo_build.lock
Summary
So we’ve covered why you might want to use Hugo for your blog, how to create a Hugo blog website, add a theme, add your first post and get your project pushed to your repos in your Github account where they are now safely backed up, and ready to be served to the world.
In the next instalment, I will explain how to use Github to serve your blog and map the URL to one using your own domain.