Everyone needs email… itʼs what enables us to receive communications from e-commerce sites and other internet services. So when faced with the challenge of creating a personal email address, where do most people turn? Invariably, they choose GMail.
On the surface GMail presents a very attractive solution for email. Itʼs pretty feature rich, it works reliably (except in China!) and itʼs normally free for personal use. This is fine as long as you realise that you are the commodity when using free services like this.
In this case of GMail, all your inbound and outbound emails are “read” and that information is used to augment your digital footprint and advertising profile. The benefit for Google is that the richer your profile, the more targeted your advertising is and the more likely you are to engage with it. This translates to better advertiser click throughs and greater revenue for Google.
So if you don’t want to be a commodity what can you do? One option is to find an alternate email service; remembering that the other free ones will probably also be profiling you for advertising (and possibly other purposes). So that leaves you the option of paying for an email service in the hope that by paying them it means that they arenʼt as interested in your data.
A paid email service normally incurs a charge per mailbox (email address) and the amount of storage you require. Some providers also allow you to use your own domain rather than theirs; sometimes this feature means an additional charge. The benefit of using an email service provider is that getting emails delivered correctly can be tricky involving some specific DNS (Domain Name Service) settings for your domain (purporting) to host the email, and existing email service providers have mostly figured all this stuff out.
My Email Requirements
I had specific requirements for my email hosting including these:
- I need to host email for at least 3 domains
- I need between 3 and 10 (real) email addresses (mailboxes) for each domain
- I want email addresses linked to my domains, not generic mail addresses like me@gmail.com
- I want unlimited email aliases for each domain
- I donʼt want mailbox quota limits imposed on me
- I want good spam management and reliable mail delivery
- I donʼt want any commercial organisation harvesting information from my emails
- I want backups of my emails
- Oh and I don’t want to pay more than €10 per month for all of the above
Why use Email Aliases?
When I sign up to a new website or service, I usually use an email alias that points to my real email address.
For example, if I sign up with ServiceA.com then I will create an email alias on my domain servicea@mydomain.com pointing to my real email address me@mydomain.com and when I no longer wish to receive emails from the service, I just delete the alias. As soon as I do that I get no more emails from that company. Ever!
Host Email Yourself… Really?!
What about hosting your own mail service? Surely therein lies madness?
Ordinarily I would say “yes, you might be mad to try this” … unless you have a reasonable technical aptitude and a willingness to learn some new stuff.
This is exactly what I did recently in migrating three email domains from a server I built 11 years ago to a new server last week. Although it took me several hours to get right, I reckon I could now provision a new email server for one or more domains in less than an hour, and guarantee that emails sent from the domain would be accepted by 99% of other mail services including GMail, iCloud and Outlook.
Steps to host your own Email Server
If you want to know how I went about hosting my own email including migrating 5GB and tens of thousands of emails from my old server to a new one then read on.
These are the steps that I took:
- Provision the Server
- Install the Mail Server packages
- Configure you Mail Domains, Users and Aliases
- Configure your DNS
- Test you DNS and Mail Server
- Migrate Existing Mailboxes
- Backups
1: Provision the Server
The first thing you will need to do is provision a server. Sounds scary but isnʼt.
Although we use AWS at work, I didnʼt want to use EC2 primarily for cost reasons, so I decided to host my new server in Holland with LiteServer on a 2 core, 2GB VPS with 40GB SSD for just €6 per month (incl VAT). Holland (being in the EU) has better policies regarding data privacy so suited me better than hosting in the UK or US.
You can buy a VPS from any number of service providers but the performance of my new VPS and the support I received from LiteServer has been excellent whenever Iʼve needed help.
After paying for the server, you choose on an operating system to install - I chose Ubuntu 20.04 LTS as Iʼm familiar with it and like the package management.
One final task is to decide on the hostname of your mail server host and to correctly set the reverse DNS of the IP address assigned to your new server. This is also the hostname you will assign to your VPS by creating an entry in /etc/hosts on the server itself.
If your mail server hostname is mail.mydomain.com and the IP address is 66.100.4.42 then you need to use the VPS management console to set the reverse DNS (hostname) for 66.100.4.42 to be mail.mydomain.com - this step is vital if you want other mail servers to accept your emails.
2: Install the Mail Server packages
Selecting the right mail server solution can be tricky, and after quite a lot of research I settled on https://mailu.io/ as this provides all the features I needed including:
- Standard email packages (Postfix, Dovecot, SpamAssassin, etc) provisioned as Docker images managed using Docker Compose
- Multiple (virtual) domains with unlimited users and aliases (per domain)
- Quota management by domain and user
- SSL/TLS support including automatic certificate provisioning and refresh using Letʼs Encrypt
- DKIM and DMARC support (vital for reliable sending)
- Spam filtering (including grey listing)
- IMAP and POP3 (mailbox) support
- Web UI for administering the mail server
- Web UI for accessing email (from an Internet cafe for example)
Mailu is an open source project which packages all the different mail services (Postfix, Dovecot, etc) into a set of Docker images that operate together using Docker Compose. This means that upgrading the server is simple as pulling a new set of images from DockerHub.
The instructions for installing Mailu are at https://mailu.io/1.9/setup.html and involves installing Docker followed by Docker Compose. The Mailu website also has a configuration tool that allows you to answer a few questions which then generates two configuration files for your specific mail setup:
- docker-compose.yml
- mailu.env
You create a directory to host your mail directories on your server and copy the two files into it. Next execute docker-compose up -d to start your mail server; this takes a couple of minutes of pulling down the docker images the first time you run the command.
Once started, your last task is to create an admin user to manage the mail server using either the Web Admin tool or CLI (Command Line Interface).
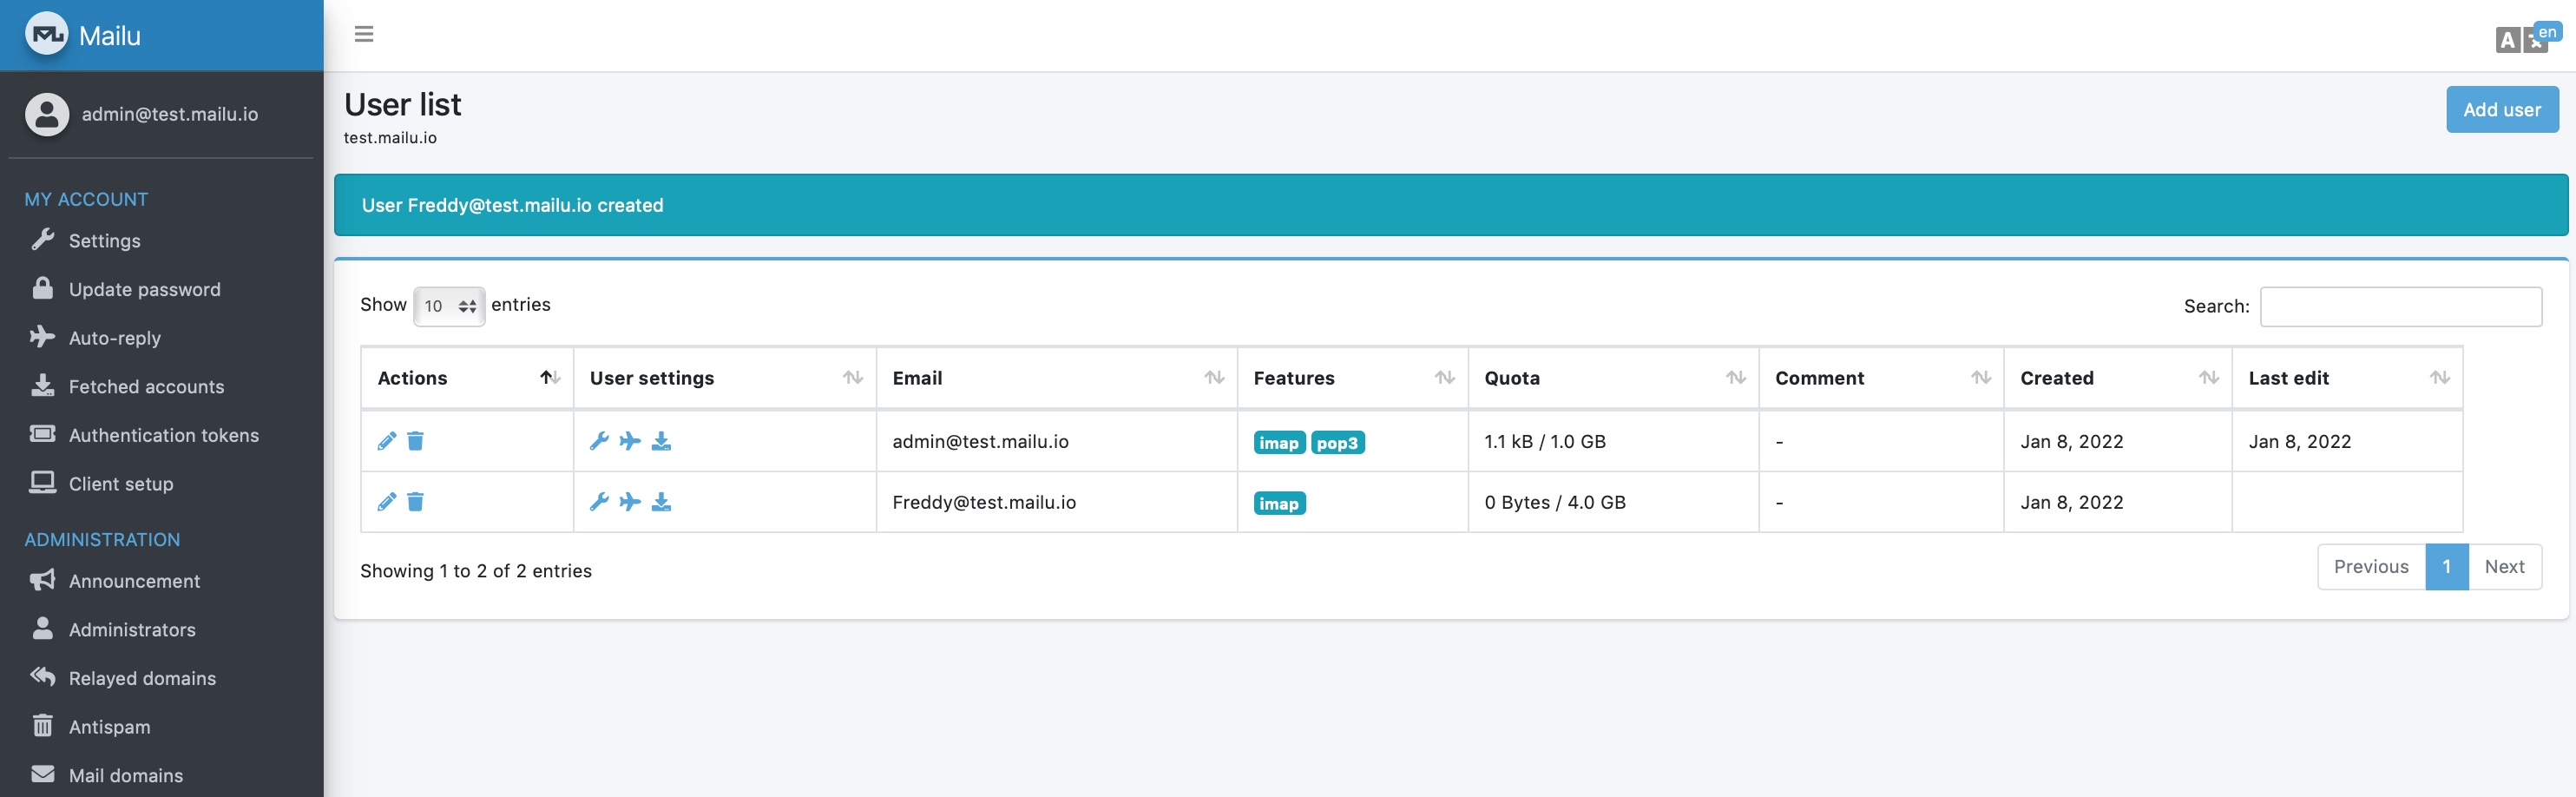
3: Configure your Mail Domains, Users and Aliases
At this point you have a fully functioning mail server and now you can add additional domains that you wish to also host on the server.
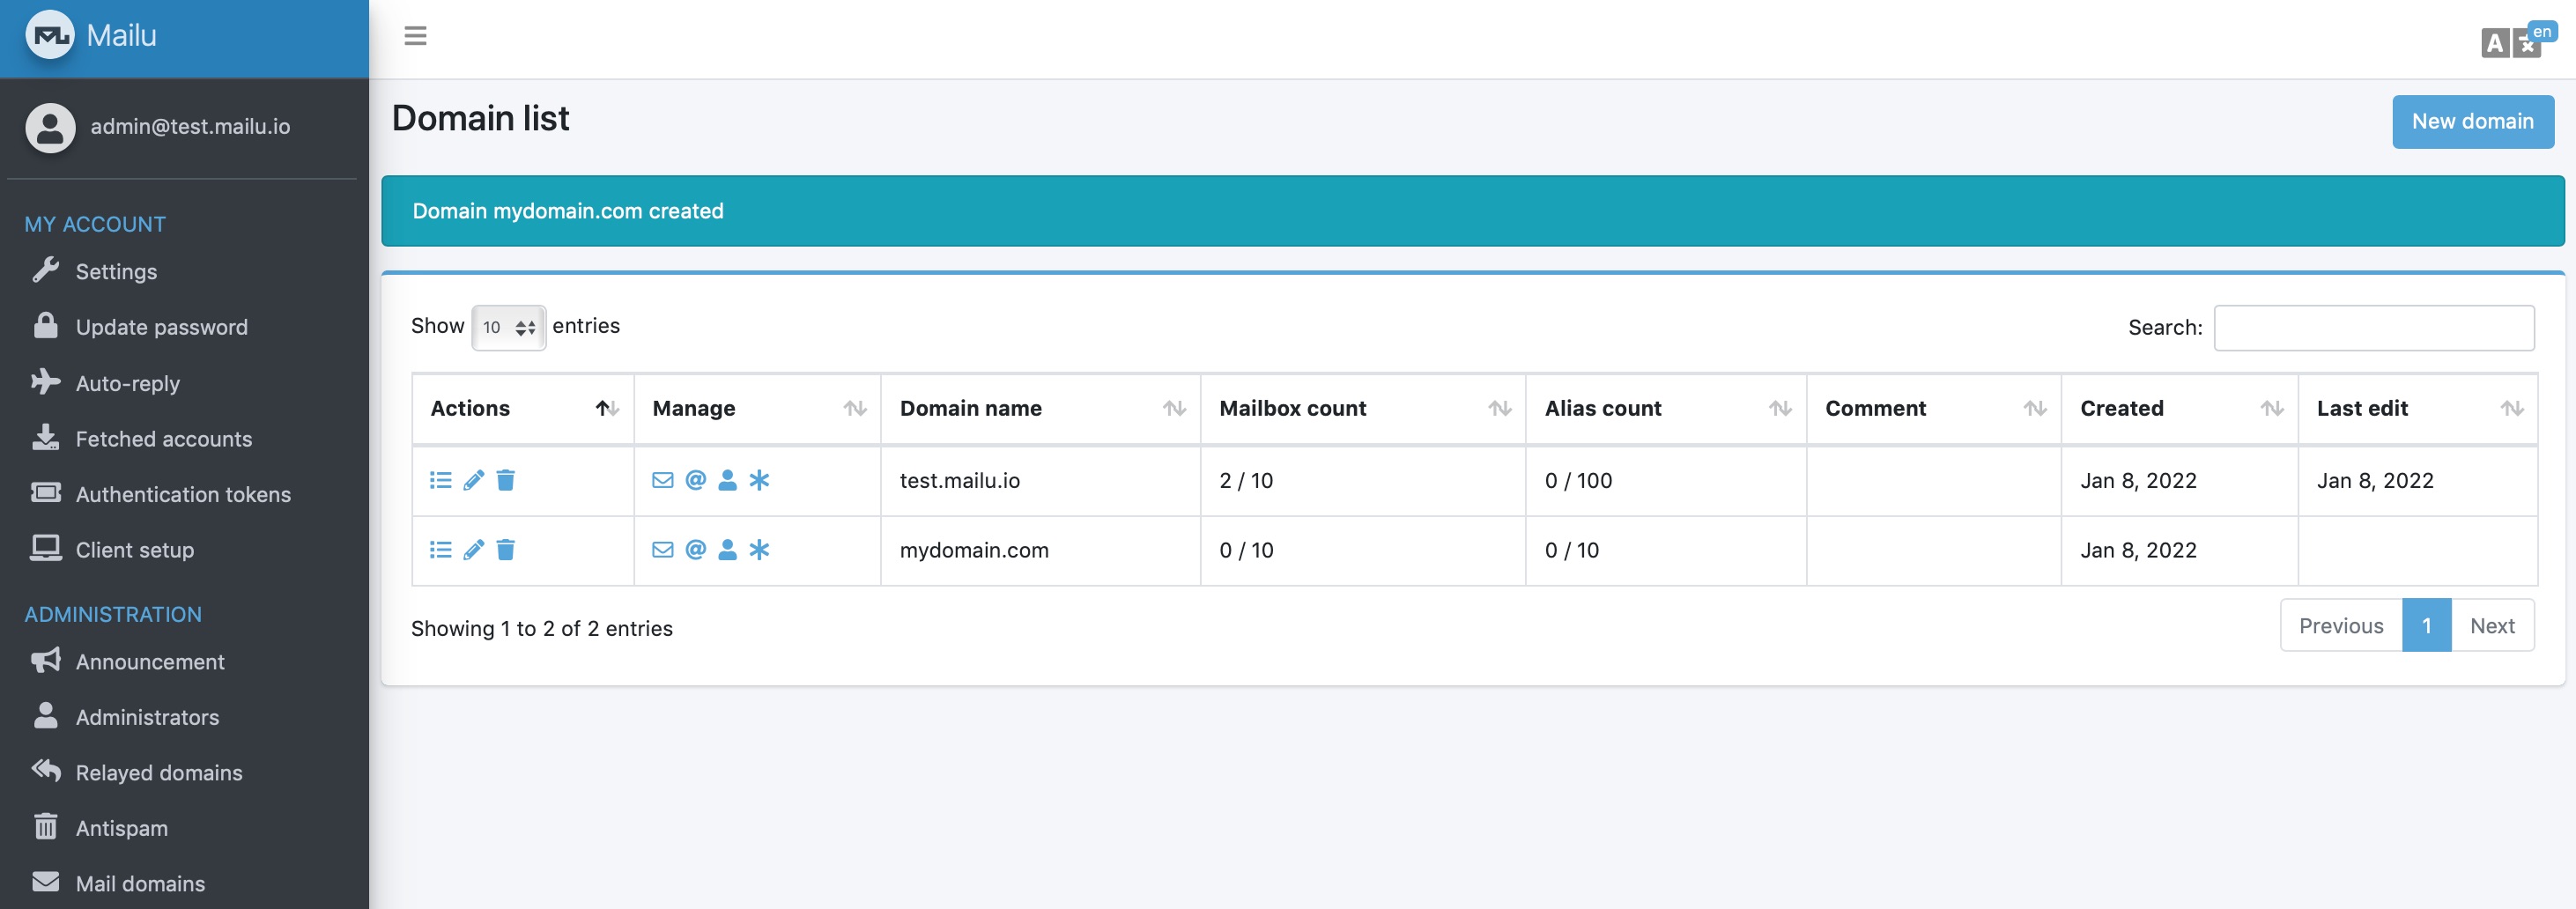
For each of the domains, add the mailboxes (email addresses) that you want.
4: Configure your DNS
Although you have a working email server, it wonʼt be able to send or receive emails over the internet just yet. You now need to configure your DNS with some specific entries which can be generated by Mailu for you. This is one brilliant aspect of Mailu - the admin GUI gives you all the settings you need to get the DNS entries correct. It doesnʼt require any guesswork or much trial and error.
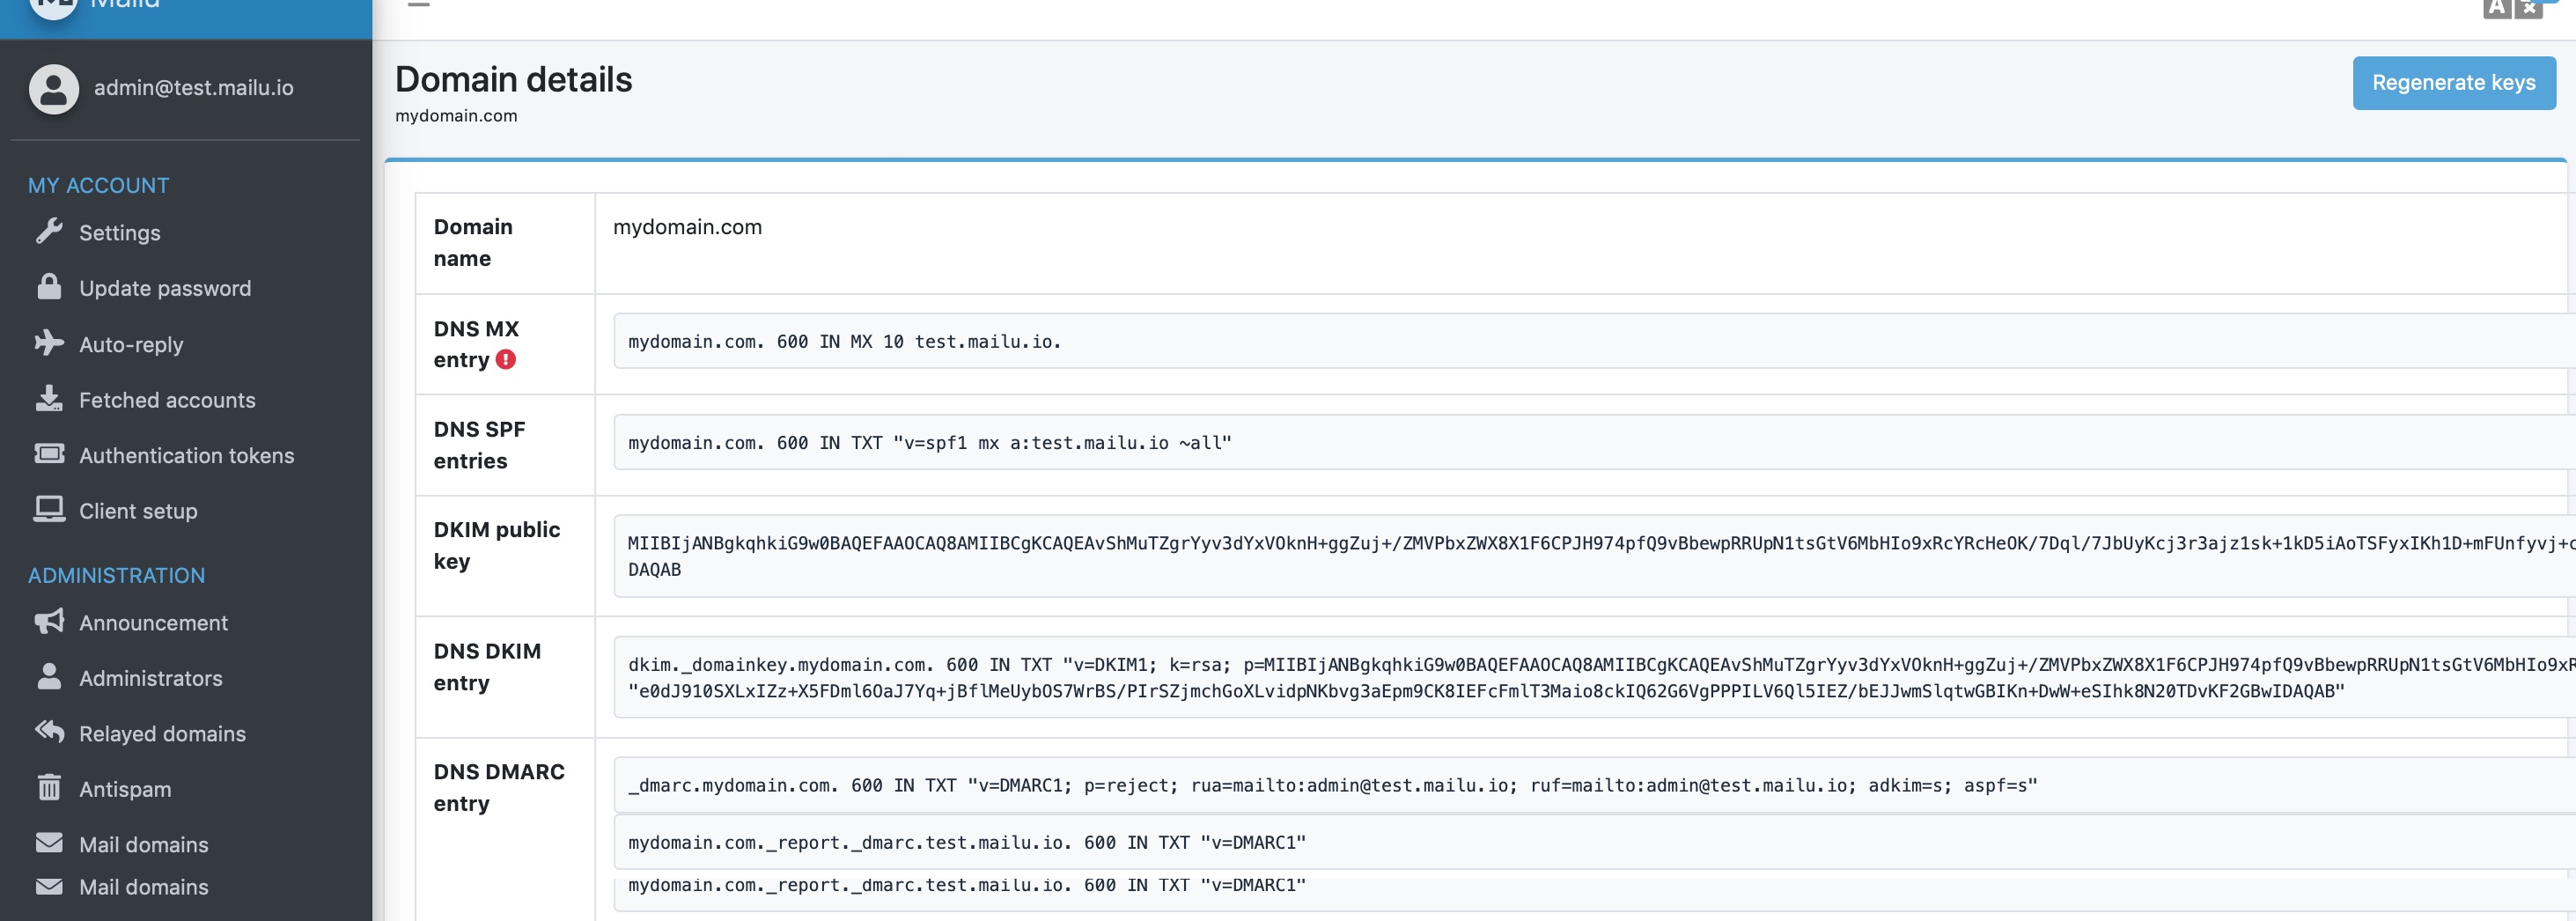 Note that you should generate keys for each of the domains hosted on the mail server
Add or update the following DNS records in your DNS management console for each of your domains:
- (Blank) A name record with the IP address of your new server (optional if you already have a server provisioned)
- A name record with the hostname and IP address of your new mail server
- MX record for routing mail (see Mailu DNS MX entry above)
- TXT record to hold the SPF entry (see Mailu DNS SPF entry above)
- TXT record to hold the DKIM entry (see Mailu DNS DKIM entry above)
- TXT record to hold the DMARC entry (see Mailu DNS DMARC entry above)
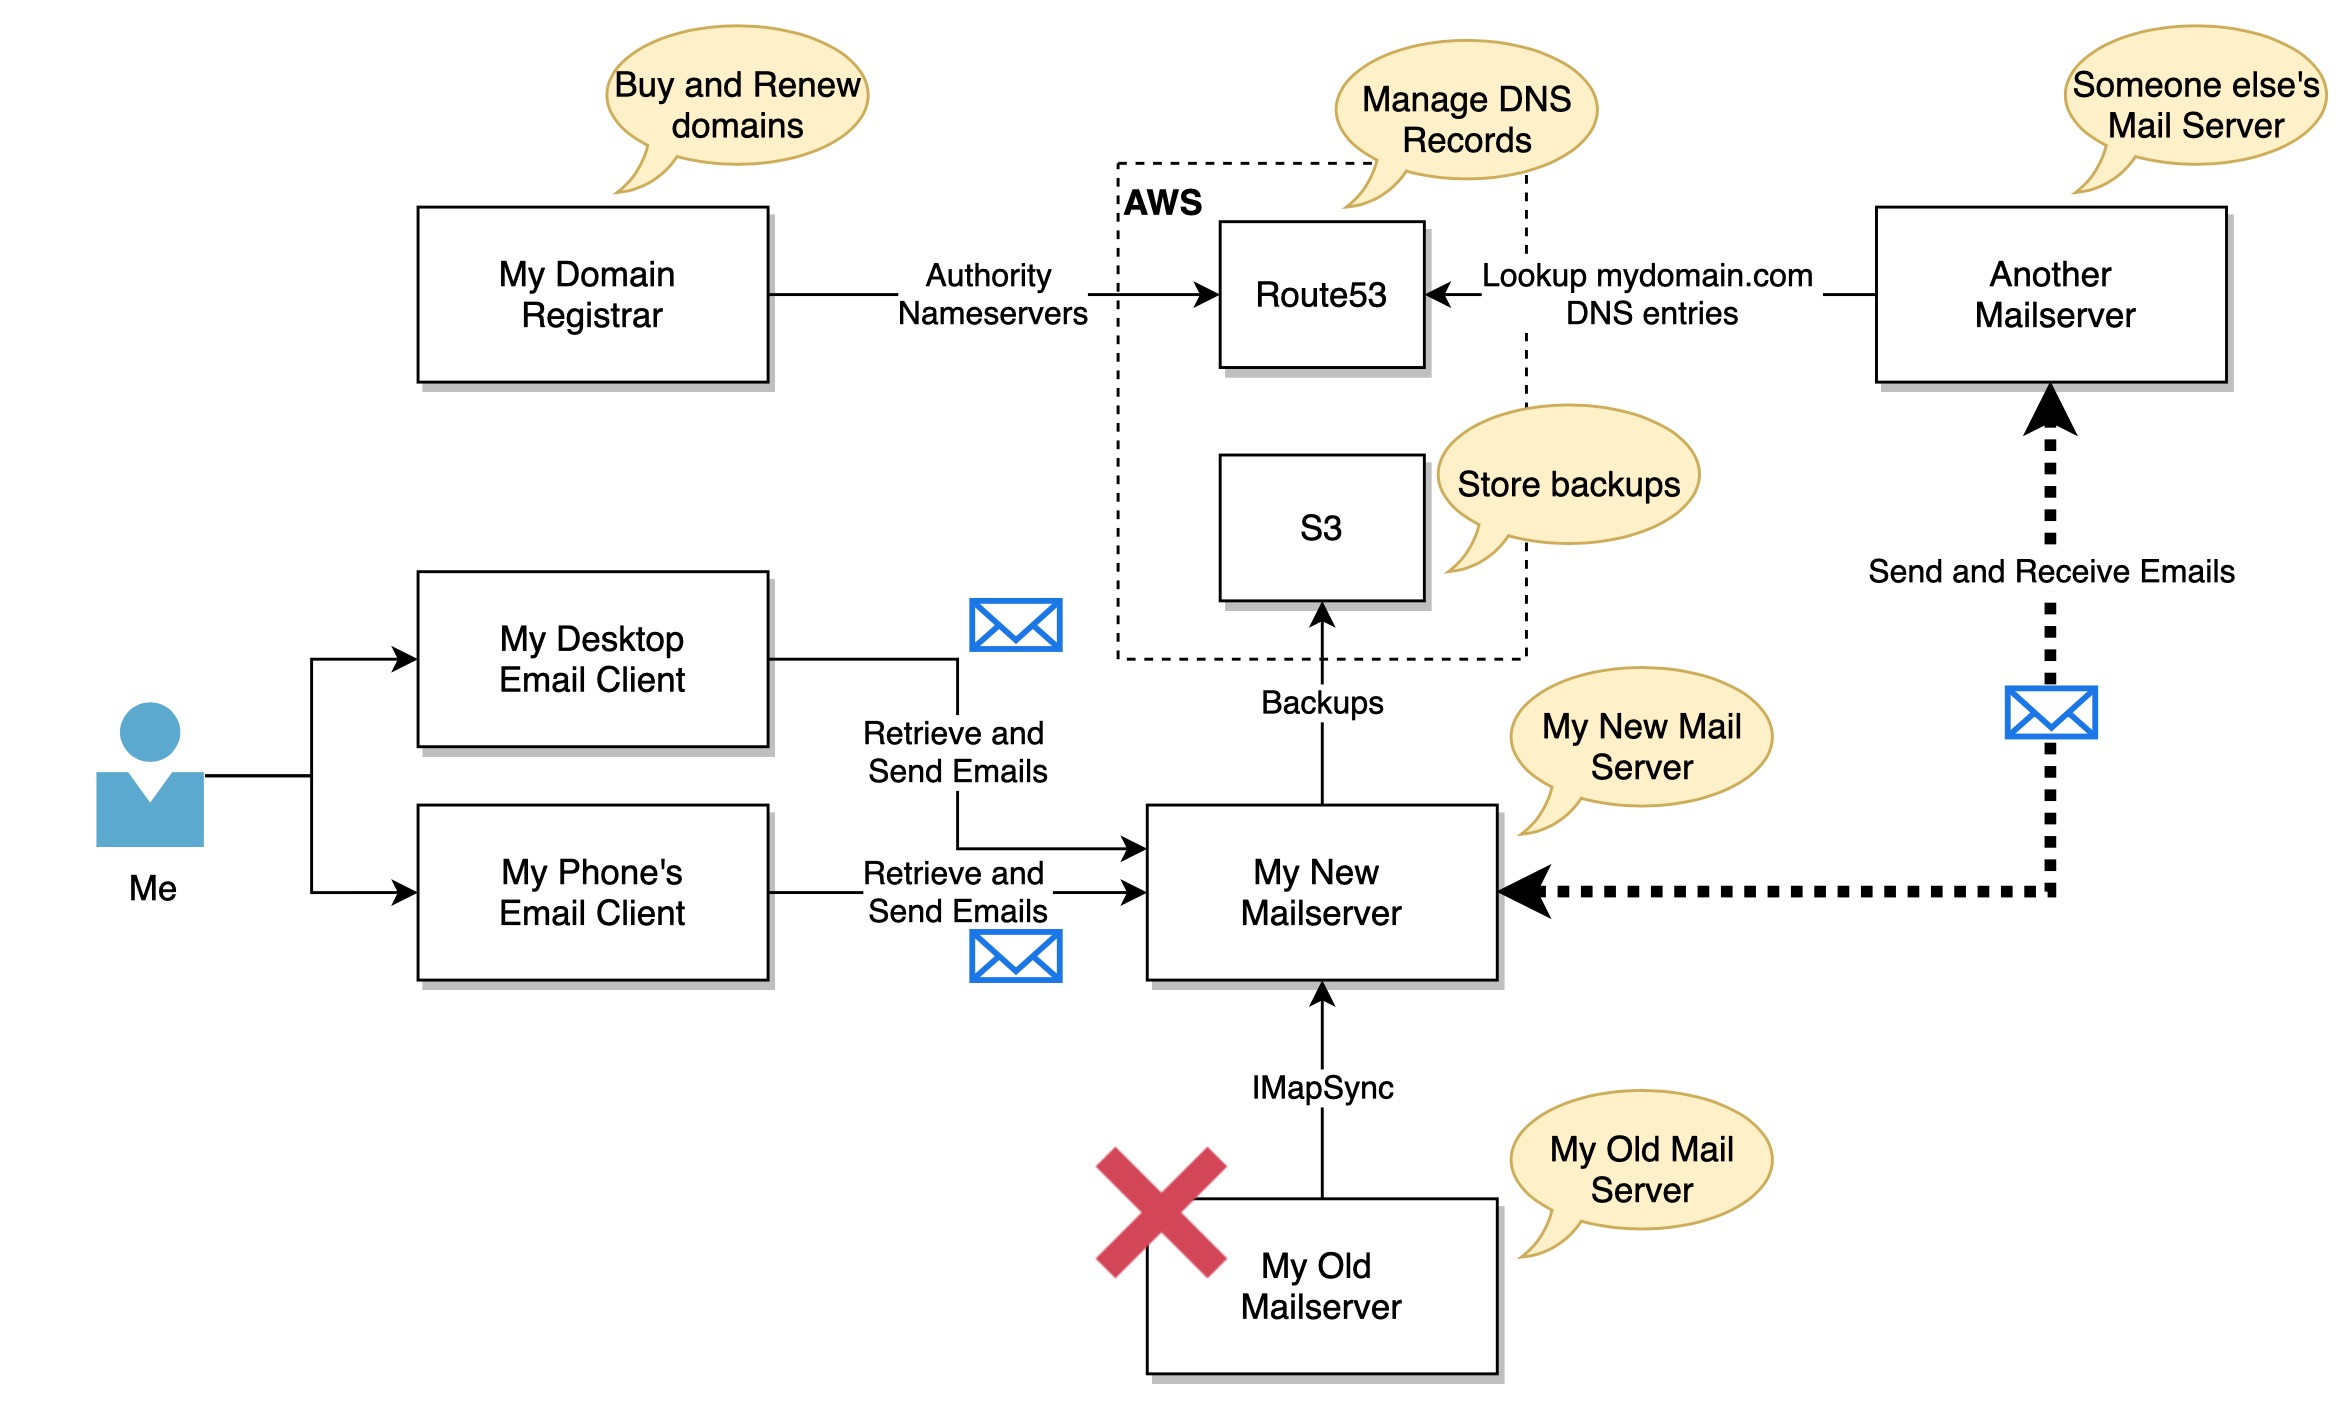
The domain registrar that I purchased my domains through has a totally useless DNS management console. After much tearing of hair, I decided to delegate my domainʼs DNS entries to AWS Route53 and manage them there instead.
If you want to do the same and donʼt have an AWS account already, then youʼll need to create one. Once youʼve done that select the Route53 service and create a new zone for each of your domains (mydomain.com for this example), and add the entries listed above.
If youʼre going to use Route53 (and you probably should as itʼs very easy to manage and reliable) you need to change the Authority NS (name server) records in your current registrarʼs DNS management console with the four AWS nameservers that Route53 assigns for your zone. Doing so transfers management of the DNS records from your registrar to AWS although you will still pay your current registrar for domain renewals etc.
5: Test your DNS and Mail Server
A great way to test your mail server setup and DNS configuration is with the tools available at https://mxtoolbox.com
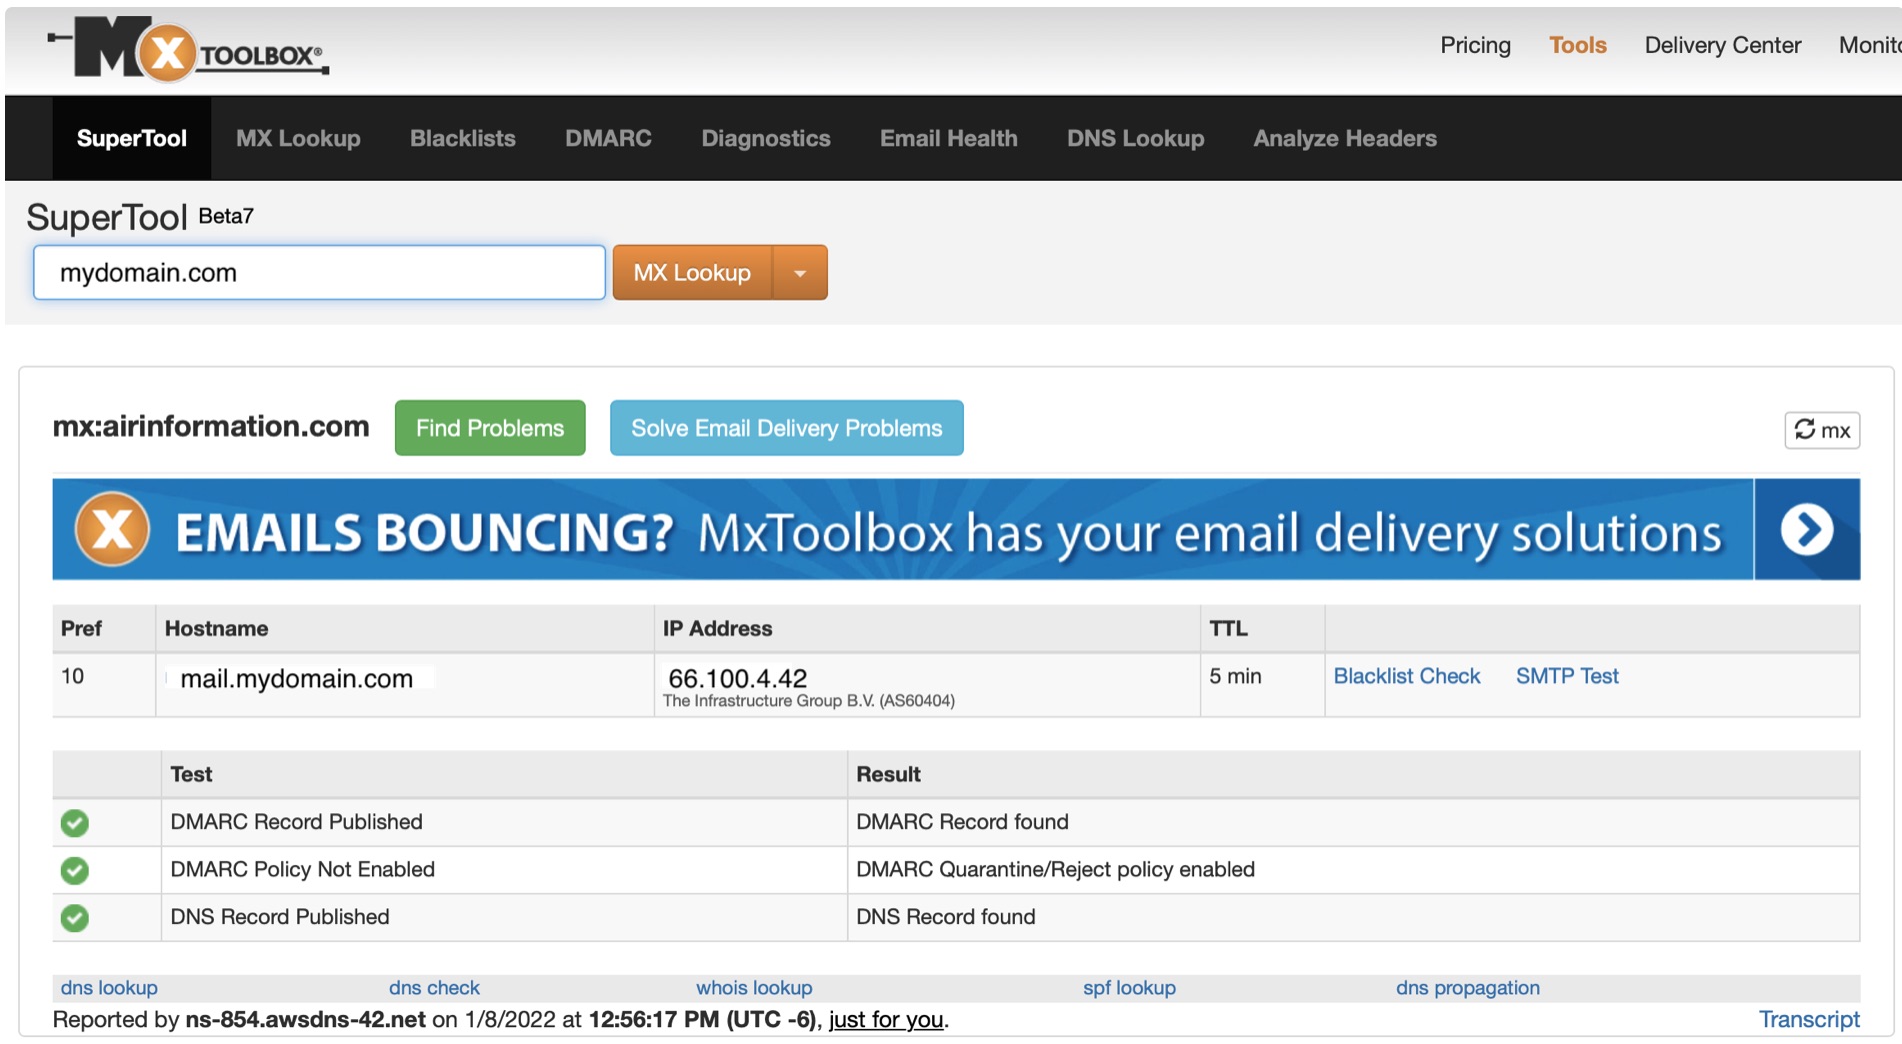
Using this service quickly helps you to debug any mail server or DNS configuration issues. If there is a problem, it also indicates what the issue is and suggestions on how to fix it.
If there are no issues then you can set up a mail client to send and receive emails to do the final testing or use the Mailu webmail feature to do the same.
Hopefully everything works fine but if it doesnʼt use the Mailu documentation and MXToolbox information to diagnose and fix any remaining issues.
6: Migrate Existing Mailboxes
If you are moving your email (domain) from one provider or server to another youʼll want to try ImapSync to migrate the mailboxes. You can get more information on the tool at https://github.com/imapsync/imapsync
I found this to be a brilliant tool that made the daunting task of migrating tens of thousands of emails from my old server to my new one so simple.
You migrate each user one at a time using commands like the one below:
imapsync --host1 oldmailserver.mydomain.com --user1 me@mydomain.com --password1 XXXX \
--host2 newmailserver.mydomain.com --user2 me@mydomain.com --password2 XXXX
The sync ensures that the mailbox on the new mail server is identical to the old one, with all the same folders and emails within. You can safely run this command multiple times; each time it runs it will sync any new changes since the last time you ran it.
I also had to re-create 60 aliases from my existing email setup. This was easily managed using the Mailu CLI with a script I prepared.
Here is an example of creating an alias for my BBC account (bbc@mydomain.com) using the CLI:
docker-compose exec admin flask mailu alias bbc mydomain.com "me@mydomain.com"
Once all your mailboxes are migrated you can switch off your old server (specifically the SMTP and IMAP services) ensuring that your DNS MX record points to your new server. Otherwise your email wonʼt be delivered correctly.
In terms of syncing and migrating mailboxes, this is what I did.
- Provision the new Mailu server
- Add all the DNS entries EXCEPT the MX one so emails still arrive at the old server
- Run ImapSync to migrate all the mailboxes
- First run (for each mailbox) to get the bulk of the migration done
- Second run (for each mailbox) to catch any new updates
- Switch off the IMAP service on the old server
- Update the MX record to point to the new server
- Reconfigure all my email clients (phone, desktop etc) to retrieve and send emails using the new server
7: Backups
The final step is to ensure that your mail server is being backed up regularly. You do perform backups, right?
I decided to use AWS S3 to store my backups as itʼs simple to use, cheap and reliable.
Using S3 from the mail server involves installing the AWS CLI on it and creating an IAM User whose credentials you use with the AWS CLI. My IAM user only has rights to S3 which ensure that a server breech doesnʼt give someone access to my AWS account with Admin privileges.
The steps for backing up the server are as simple as:
- Stop the mail server
docker-compose down
- Tar the /mailu directory with compression
tar cvf mailu.tar.gz /mailu
- Copy the tar file to S3
aws cp mailu.tar.gz s3://emailbackup.mydomain.com/
- Restart the mail server
docker-compose up -d
I am actually using three cron jobs:
- Executes daily to generate the tar file which is then copied to S3
- Executes once a week and copies the same tar file to a file called
weekly_mailu.tar.gzin S3 - Executes once a month and copies the same tar file to a file called
monthly_mailu.tar.gzin S3
In order to avoid excessive storage charges, I don’t have versioning switched on. This means at any one time there are at most three backup files in my S3 bucket:
- The most recent daily backup
- A backup each Sunday
- A backup from the 1st of the month
In terms of AWS S3 pricing I need to store 3 x 5Gb backups resulting in a cost of less than $1 per month as the transfers in are free.
Spam Management
Another great feature of Mailu is that spam blocking is configured out of the box including using all the relay block lists.
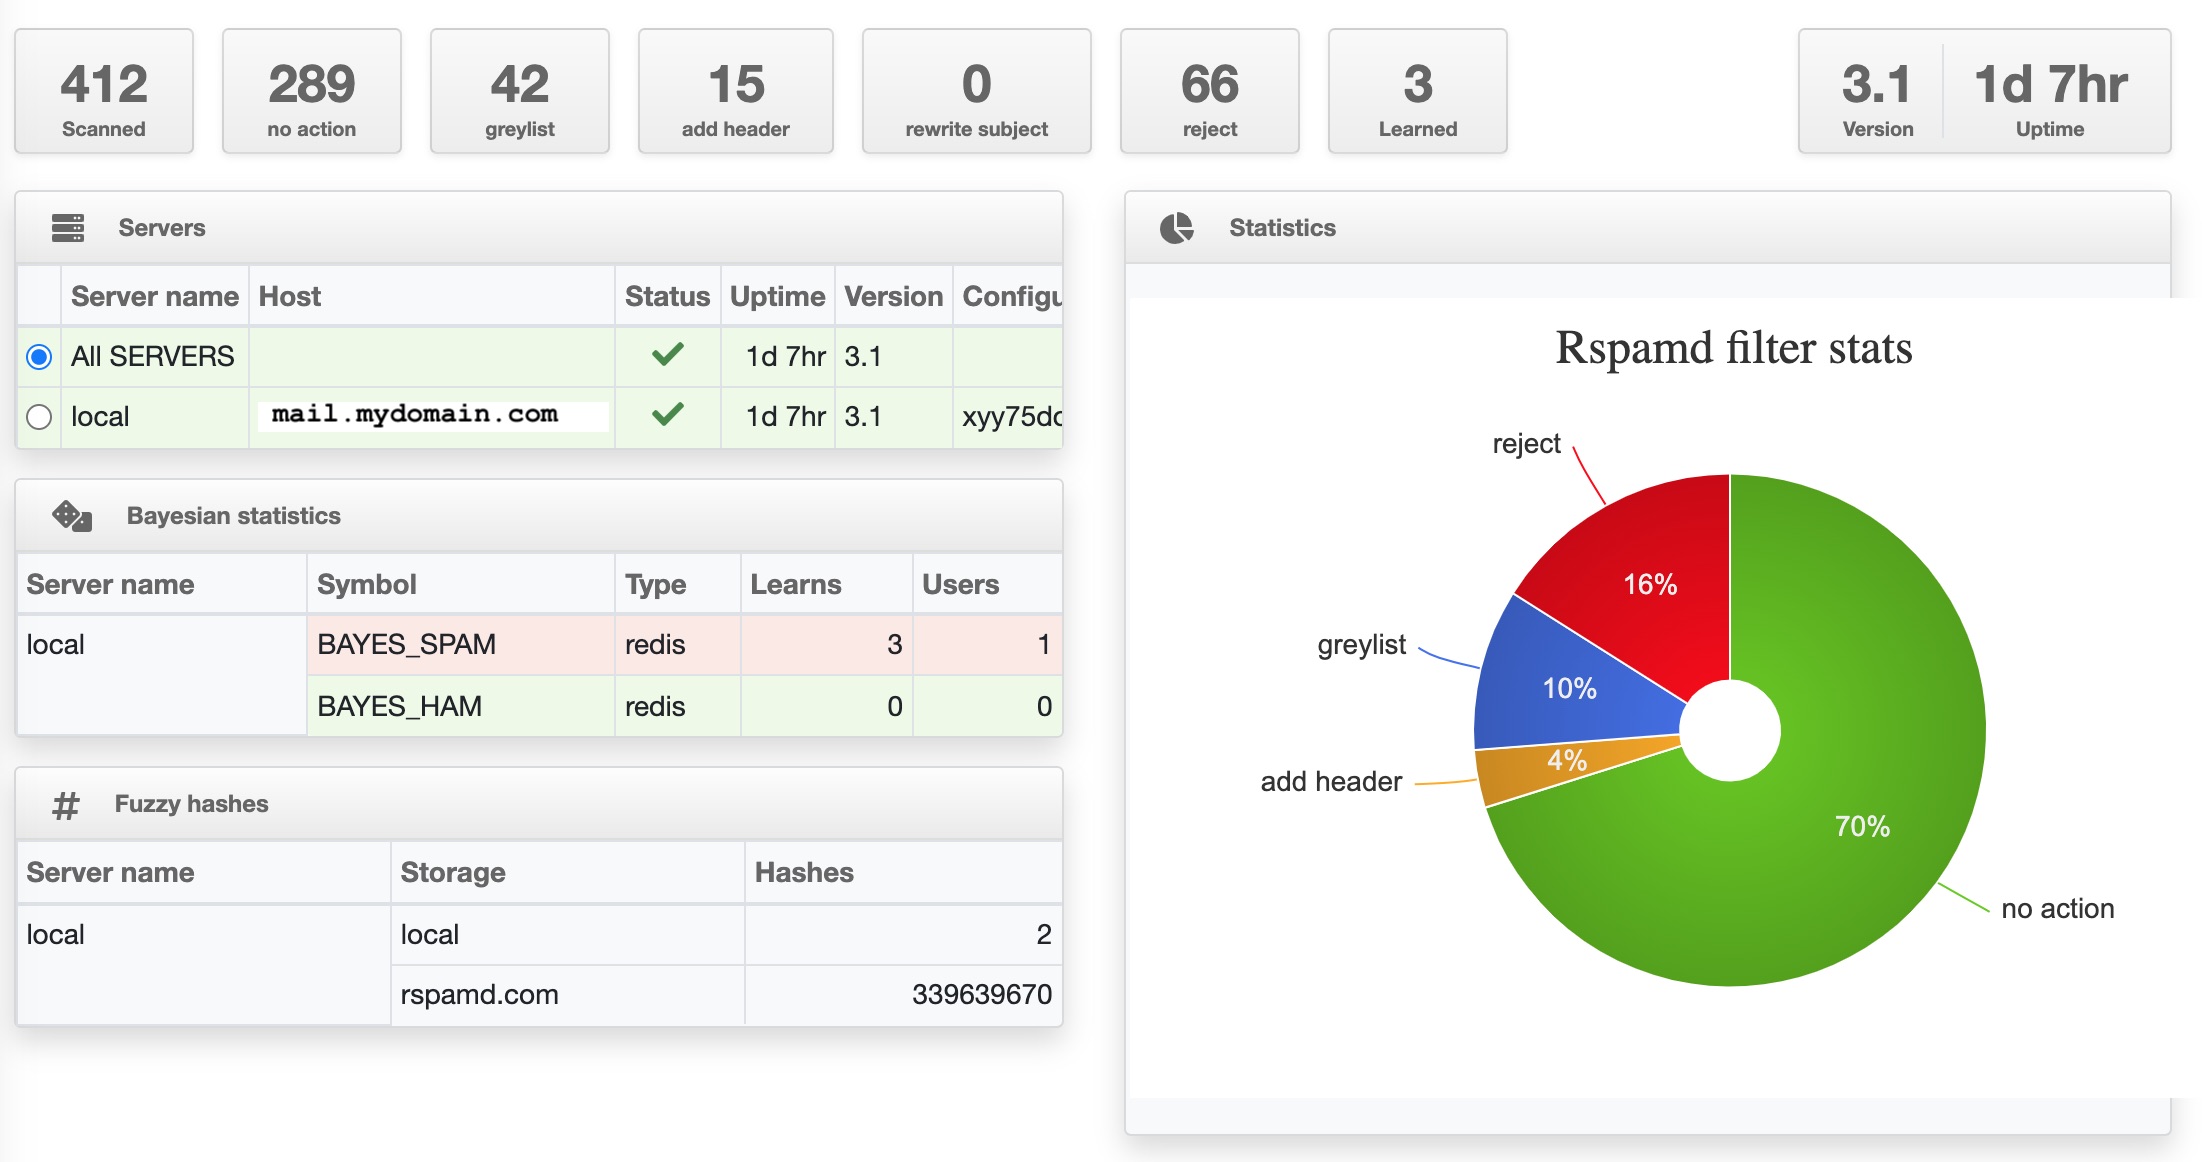
You can see that of the 400 emails received in a 30 hour period, the following actions were taken:
- 289 were accepted and routed to mailboxes
- 42 were grey listed - this means that they were initially rejected with a request to the sending mail server to try again later. This normally catches opportunistic spammers.
- 15 had a suspected junk header added
- 66 were rejected completely
- 3 emails that I marked as spam will be used for future spam protection
Mail Setup
Conclusion
The process of setting up a mail server seemed pretty daunting at the outset but in fact turned out to be a lot easier than I imagined. I also had fun reacquainting myself with SMTP/IMAP, Linux, AWS and DNS management.
As youʼve probably gathered, rather than giving the exact steps you need to take to create your own server, I have tried to explain the scope of work that you would need to undertake to get a similar mail server up and running. For more detailed installation instructions, visit the documentation at https://mailu.io - it is generally very good.
So how has it turned out? Well so far so good. My email system has been rock solid, especially sending and receiving emails reliably. None of my emails are getting blocked by the big service providers, and Iʼm getting almost no spam.
I also have the ability to host unlimited domains, mailboxes and aliases on this server (disk space permitting) for less than €10 per month (server + backups) which means Iʼve succeeded in all my original objectives.
Got quite a lot of feedback on this article on Hacker News - definitely worth a read if you are embarking on a similar project
In answer to a few of the points raised:
- I should have included the TXT record for the SPF entry in section 4 above (which I have now done) - this indicates to other mail servers who is allowed to send emails for your domain
- Contabo has also been suggested as an alternate reliable and low cost VPS provider in Germany
- Many public networks block port 25 and 587 and you can resolve this by configuring Postfix to accept SMTP connections on another port - I did this on my original mailserver and plan to do it with the new one
- Hosting yourself has the risk that your VPS public IP gets blacklisted. I’ve not experienced this problem so far but mitigations include speaking to your VPS provider to see if they can help you resolve the issue or to route your emails through a (paid for) relay like Amazon’s SES
- Other (self hosted) mail solutions you might want to investigate include Mailcow and Docker Mailserver. Or just seach for “docker mail server” in Google or your favourite search engine
Please note that all the example domain names, aliases and IP addresses above are bogus and provided to help you understand what is going on. The LiteServer link above is an affiliate link but using it wonʼt cost you a penny and helps pay for my server hosting